You hold your hand over a vent. The air barely moves. The system runs all afternoon, yet the upstairs bedroom stays warm and the living room feels cold. Your energy bill keeps rising. Something is wrong.
Weak airflow is one of the most common HVAC complaints in North Carolina homes. Long, humid summers push systems hard. Spring pollen clogs filters fast. Winter brings long heating cycles. Any problem that restricts air will show up quickly.
The good news is that many airflow problems have simple causes. A dirty filter, a closed vent, or a blocked return can all reduce flow. Others are more technical, such as duct leaks or high static pressure. Those need a trained technician.
This guide shows how to fix HVAC airflow issues step by step. You will start with the easy checks you can do in minutes. Then you will move to deeper causes and learn when to call for help.
What Causes Poor HVAC Airflow?
An HVAC system is a closed loop of air. The blower pulls air in through return vents. The air passes through a filter and over a coil. Then it travels through ducts and out the supply vents. A problem at any point in that loop can cut airflow.
Common Causes of Weak or Uneven Airflow
- Dirty or clogged air filters
- Closed or blocked supply and return vents
- Leaky, crushed, or disconnected ducts
- A failing blower motor or capacitor
- A frozen or dirty evaporator coil
- Wrong fan speed settings
- Poor duct design or an unbalanced system
- High static pressure
Quick Symptom Guide
Use this table to narrow down the likely cause before you start.
| What you notice | Likely cause | Who can fix it |
|---|---|---|
| Weak air from every vent | Dirty filter, blower problem, or coil issue | Homeowner first, then a technician |
| One room has weak air | Closed vent, crushed duct, or duct leak | Homeowner first, then a technician |
| Air feels warm in cooling mode | Frozen coil or low refrigerant | Technician |
| Loud whistling at vents or returns | High static pressure or undersized returns | Technician |
| Hot and cold rooms | Poor balance or duct design | Technician |
| Airflow drops after running a while | Frozen evaporator coil | Technician |
Safety Before You Start
Turn off the system at the thermostat before you open panels or access doors. Do not open the blower compartment or touch electrical parts unless you are trained. Stick to the checks in the first steps. Leave the rest to a licensed technician.
Step 1: Check and Replace Dirty HVAC Air Filters
Start here. A clogged filter is the most common cause of weak airflow. It is also the easiest fix.
How a Dirty Filter Hurts Airflow
The blower must pull air through the filter. Dust and debris fill the filter fibers over time. Air then struggles to pass. Less air reaches your rooms. The blower works harder, and your system may overheat or freeze up.
A dirty filter can also cause these problems:
- Longer run times and higher energy bills
- Ice on the evaporator coil in cooling mode
- Extra wear on the blower motor
- Uneven temperatures through the house
How to Check Your Filter
- Turn the system off at the thermostat.
- Find the filter slot. It is usually at the return grille or at the air handler.
- Slide the filter out.
- Hold it up to a light. If you cannot see light through it, replace it.
- Check the size printed on the frame and buy the same size.
- Install the new filter with the arrow pointing toward the blower.
How Often to Replace It
A 1-inch pleated filter usually needs a change every 60 to 90 days. Check it monthly in spring pollen season and in homes with pets. Our guide to DIY HVAC maintenance tasks walks through safe filter changes and other easy jobs.
Do Not Choose a Filter That Is Too Dense
A higher MERV rating catches more particles. It also adds resistance to airflow. A very dense filter in a system that cannot handle it can cause the same weak airflow you want to fix. Check your equipment manual for the highest recommended rating.
Step 2: Inspect Blocked or Closed Air Vents
Next, walk through your home. Look at every supply vent and return vent. Small blocks cause big airflow problems.
Supply Vents vs. Return Vents
Supply vents push conditioned air into a room. Return vents pull air back to the system. Both must stay open. Many people close supply vents in unused rooms to save energy. That often backfires.
Closing vents raises pressure in the duct system. The blower pushes against more resistance. Air may leak out of duct seams. Efficiency can drop, and the system may wear out sooner. The U.S. Department of Energy advises against closing too many vents for this reason.
What to Look For
Check these common problems:
- Furniture pushed against a vent or return grille
- Rugs or curtains covering a floor or wall vent
- Dust and pet hair packed into the vent slats
- Vent louvers set to nearly closed
- A return grille that is too small for the system
How to Fix It
Keep at least 12 inches of clear space around vents. Move furniture if you can. Open all louvers fully. Remove the grille and vacuum the duct opening a few inches deep. Wipe the grille with a damp cloth.
Return air matters just as much. Interior doors can also act as blockers. If a bedroom has a supply vent but no return path, closing the door can raise pressure and cut airflow. Undercut the door, add a jumper duct, or add a transfer grille. A technician can advise on the best choice.
A Real-World Example
A homeowner in Garner noticed weak airflow in a back bedroom. The vent was open. The filter was clean. The cause was a bed pushed tight against the return grille. Moving the bed a foot away fixed most of the problem. Simple checks come first for a reason.
Step 3: Check for Blocked or Leaking Air Ducts
If filters and vents look fine, the ductwork comes next. Ducts hide in attics, crawl spaces, and walls. Problems there are easy to miss. They are also common.
Signs of Duct Problems
Watch for these clues:
- One room or one zone gets much less air than others
- Rooms over the garage or in the attic stay hot or cold
- Dust blows from vents even with a clean filter
- Energy bills rise with no change in usage
- Rattling, whistling, or popping sounds from ducts
- Rooms that feel stuffy or humid
Common Duct Issues
Leaks and loose seams. Over time, joints separate. Air escapes into the attic or crawl space instead of your rooms. The U.S. Department of Energy notes that leaky ducts can waste a large share of conditioned air, and sealing them can improve comfort and efficiency.
Crushed or kinked flex duct. Flexible duct can sag or get stepped on in attics. A crushed section restricts air like a pinched hose.
Disconnected ducts. A duct can pull off a connection. Air then pours into an empty space. This can drop airflow in a room to almost nothing.
Blocked or dirty ducts. Debris, rodent nests, and construction dust can build up. Heavy blockage is less common, but it does happen after remodeling work.
Poor design. Some ducts are too small or too long. They cannot deliver enough air. This is common in additions and older homes.
What You Can Check Yourself
If your attic or crawl space is safe to enter, look at the duct runs with a flashlight. Look for sagging, crushed sections, or gaps at joints. Do not step on ductwork or insulation. Skip the attic in extreme heat. North Carolina attics can be dangerous in summer.
You can also feel along visible duct seams with the system running. Cool or warm air on your hand at a joint suggests a leak.
Professional Fixes
A technician can seal leaks with mastic or approved tape. They can repair or replace damaged flex duct and add support where needed. They can also test total duct leakage with specialized tools. This testing gives clear numbers instead of guesses.
Step 4: Inspect the HVAC Blower Motor
The blower motor drives the fan that moves air through your system. When it weakens or fails, airflow drops. This is a mechanical and electrical problem. A technician should handle most of it.
How the Blower Works
The blower sits inside the air handler or furnace. It spins a wheel, called a squirrel cage, that pushes air into the ducts. Two common motor types exist. A PSC motor runs at fixed speeds. An ECM or variable-speed motor adjusts speed to match demand.
Signs of Blower Problems
- Weak airflow from all vents
- The blower runs slowly or does not start
- Humming, squealing, or grinding sounds
- A burning smell near the air handler
- The system shuts off after short run cycles
- The fan runs, but air feels weak
Common Causes
A bad capacitor. The capacitor gives the motor the start-up boost it needs. A weak capacitor makes the motor run slow or fail to start. It is a common and fairly low-cost repair.
A dirty blower wheel. Dust builds up on the fan blades. The wheel moves less air. It can also go out of balance and make noise.
Worn bearings. Old motors wear out. They may squeal or run hot.
A failing motor. At some point, the motor reaches the end of its life. Replacement may be needed.
What You Can Do
Check that the system has power. Look at the breaker and the service switch near the air handler. Make sure the filter is clean. Then stop. The blower area has live electrical parts and a spinning fan. Call a licensed technician for any inspection inside the cabinet.
If your furnace blower is the issue in winter, our furnace repair services in NC covers blower diagnosis and repair.
Step 5: Clean Dirty Evaporator Coils
The evaporator coil sits above or inside the air handler. It cools and dries the air in summer. Air must pass through its tight fins. When the coil gets dirty or icy, airflow falls.
How Coil Problems Cut Airflow
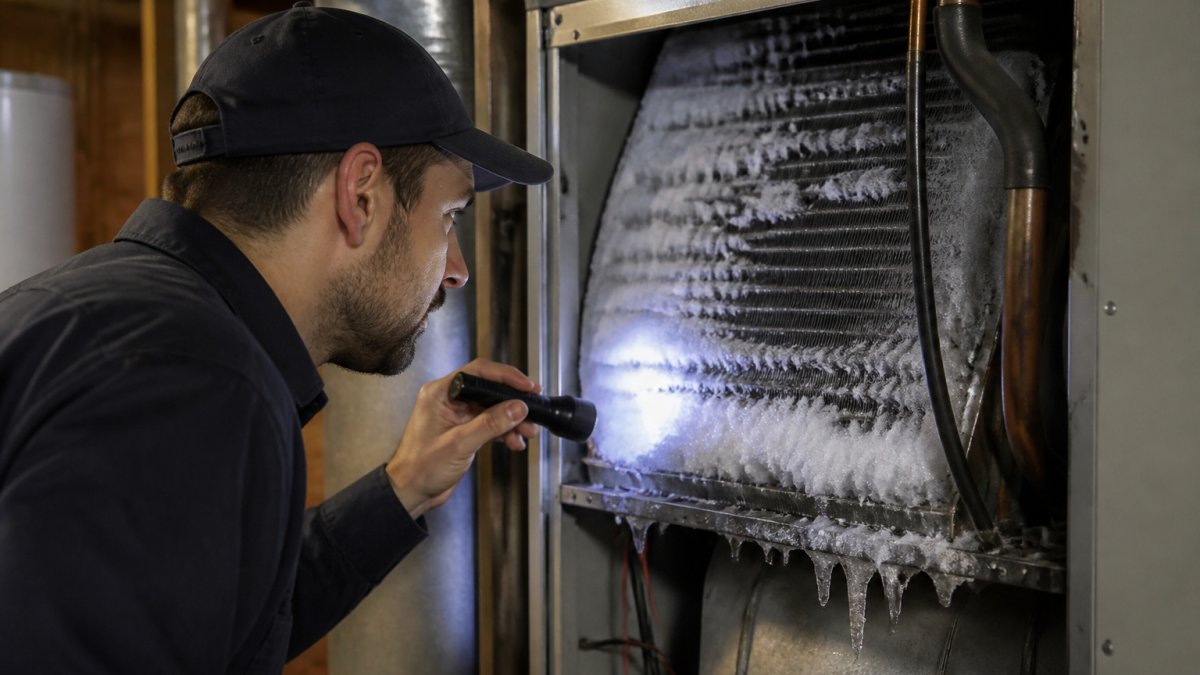
Dust that gets past the filter lands on the coil. It forms a thin mat over time. Moisture on the coil makes it stick. The fins then block air. In bad cases, the coil freezes into a block of ice. Almost no air can pass.
Signs of a Coil Problem
- Airflow starts strong, then fades after the system runs for a while
- Ice or frost on the indoor unit or refrigerant line
- Water leaking around the air handler
- Warm air from vents in cooling mode
- The outdoor unit runs, but the house does not cool
What to Do If You See Ice
Turn the cooling off. Switch the fan to “on” so air moves over the coil and melts the ice. Let it thaw fully, which may take several hours. Do not chip the ice. You can damage the coil.
Check the filter. A dirty filter is a top cause of freezing. If the problem returns after a thaw, call a technician. Low refrigerant, a weak blower, or a dirty coil may be the cause. Our guide on why your AC is blowing hot air covers related cooling problems.
Why Coil Cleaning Is a Professional Job
Coil fins bend easily. Harsh cleaners can damage the coil. The coil is also tucked behind panels. A technician has the right tools and cleaners. They can clean the coil and check the drain pan and condensate line at the same time. Coil cleaning is part of a thorough air conditioning services in Apex NC visit.
Step 6: Check HVAC Fan Speed Settings
Sometimes the system is fine, and the setting is the issue. Fan speed controls how much air moves. A wrong setting can make airflow feel weak.
Thermostat Fan Settings
Most thermostats offer two fan modes:
- Auto: The fan runs only when the system heats or cools
- On: The fan runs all the time
In “auto,” airflow stops between cycles. It may feel weak or uneven when the unit is off. In “on,” air keeps moving, which can even out temperatures. It may use more energy, and in humid weather it can push moisture from the coil back into the house. Ask a technician which setting suits your home.
Blower Speed Taps
Many air handlers allow the technician to set blower speed. Cooling usually needs more airflow than heating. If the speed is set too low, airflow falls. This can happen after a system change or a poor installation. If the speed is set too high, rooms may feel drafty or noisy.
Variable-Speed Systems
Variable-speed blowers change speed on their own. They often run slowly for long cycles. The airflow may feel gentle at the vent. That is normal. Compare the room temperatures, not just how the air feels on your hand.
What to Do
Check your thermostat settings first. Make sure it is set to the right mode. Replace weak batteries if your thermostat uses them. If the blower speed seems wrong, ask a technician to measure airflow and adjust it. Do not change blower wiring or settings yourself.
Step 7: Fix Uneven Airflow Between Rooms
Some homes have airflow in every room, but not in equal amounts. One room feels like a freezer. Another feels like an oven. This is a balance problem, not a failure.
Why Rooms Get Different Airflow
Several factors create uneven airflow:
- Rooms far from the air handler get less air
- Upstairs rooms warm faster than downstairs rooms
- Rooms with many windows gain more heat
- Duct sizes do not match room needs
- Bonus rooms and additions sit on ducts that were never designed for them
- Returns are missing in closed rooms
Two-story homes are common across Wake County and the Triangle. They often show this problem. Heat rises, so the upper floor runs warmer in summer.
Simple Fixes to Try First
Start with low-cost steps:
- Open all vents fully and clear the area around them
- Keep interior doors open, or add a return path
- Close blinds on sunny windows to cut heat gain
- Use ceiling fans to move air in warm rooms
- Run the thermostat fan in “on” for a few days to see if temperatures even out
Air Balancing
Air balancing means adjusting airflow to match what each room needs. A technician measures airflow at each vent with a flow hood. They then adjust the duct dampers. Dampers are small gates inside the ducts. Closing one slightly sends more air to other rooms. Doing this at random can make things worse. Measurements are the safe way to do it.
Bigger Solutions
If balancing does not fix the problem, your home may need more. A technician may suggest these options:
- Additional or larger return ducts
- Duct resizing or rerouting
- A zoning system with separate thermostats and dampers
- A ductless mini-split for an addition or hard-to-reach room
- Better insulation and air sealing in the problem room
These upgrades fix the cause instead of covering it up.
Step 8: Check HVAC Static Pressure
Static pressure is the one concept most homeowners have never heard of. It also explains many stubborn airflow problems. A technician measures it, and it tells a clear story.
What Is Static Pressure?
Static pressure is the resistance air meets as it moves through your duct system. Think of drinking through a straw. A thin straw is harder to drink through than a wide one. Ducts, filters, coils, and vents all add resistance. Together, they make up the total static pressure.
Every blower is built to work within a certain pressure range. Many residential systems are rated around 0.5 inches of water column. A technician checks the manufacturer’s rating plate for the exact figure. When pressure is too high, the blower cannot move enough air.
Common Causes of High Static Pressure
- Undersized ducts or too few returns
- Clogged or overly dense filters
- Dirty coils
- Closed or blocked vents
- Sharp duct bends and long flex runs
- Dirty blower wheel
Signs of High Static Pressure
- Whistling or rushing sound at vents and returns
- Weak airflow even with clean filters
- Short blower life or repeated motor failures
- Coil freezing
- Uneven temperatures
How a Technician Measures It
A technician uses a manometer. This tool measures pressure in two places, usually before and after the blower. The difference tells them how hard the blower works. They then compare the reading to the equipment rating.
| Reading compared to rating | What it means | Typical response |
|---|---|---|
| At or below the rating | Duct system is in range | Focus on other causes |
| Slightly above the rating | Some restriction exists | Check filter, coil, and vents |
| Well above the rating | Serious restriction | Resize ducts, add returns, or upgrade parts |
Why It Matters
High static pressure is like high blood pressure for your HVAC system. It strains parts and lowers efficiency. Fixing it often improves airflow, comfort, and system life at once.
When to Call an HVAC Professional
DIY checks solve many airflow problems. Others need training, tools, and safety gear. Know where to draw the line.
Call a Technician If You See These Signs
- Airflow is still weak after you replace the filter and clear all vents
- The coil freezes more than once
- The blower hums, squeals, or will not start
- You smell burning near the air handler or vents
- One room never gets enough air, even with open vents
- You hear loud whistling at the returns or vents
- Ducts are crushed, disconnected, or leaking in the attic
- Energy bills rise with no clear reason
What a Professional Airflow Check Includes
A proper visit goes beyond a quick look. A technician may do the following:
- Measure static pressure across the system
- Check airflow at each vent
- Inspect the blower, capacitor, and motor
- Inspect the coil, drain pan, and filter fit
- Test duct leakage and review duct design
- Check refrigerant levels and temperature split
- Balance dampers for even airflow
This testing gives clear numbers. It avoids guesswork and expensive part swaps.
Prevent Airflow Problems Before They Start
Routine care keeps airflow steady. Replace filters on time. Keep vents clear. Schedule professional service twice a year, once before cooling season and once before heating season. A yearly HVAC maintenance tune-up in Chapel Hill NC lets a technician catch small issues early, such as a weak capacitor or a dirty coil, before they cause a breakdown on the hottest or coldest day of the year.
Frequently Asked Questions About HVAC Airflow Problems
Why is my HVAC system not blowing air properly?
The most common causes are a dirty filter, closed vents, a blocked return, or a frozen coil. A failing blower motor or leaky ducts can also cause it. Check the filter and vents first.
How do I increase airflow in my air ducts?
Replace the air filter, open and clear all vents, and keep return vents unblocked. If airflow is still low, a technician can test for duct leaks, crushed ducts, and high static pressure.
Why is airflow weak in only one room?
A closed vent, crushed duct, disconnected duct, or a long duct run is the usual cause. Rooms with closed doors and no return path can also lose airflow.
Should I close vents in unused rooms?
Usually not. Closing vents can raise duct pressure and cause leaks. It may not save energy. Ask a technician before you close any vents.
Can a dirty air filter cause weak airflow?
Yes. It is one of the top causes. A clogged filter restricts air, strains the blower, and can lead to a frozen coil.
How much does it cost to fix low airflow?
Cost depends on the cause. A new filter costs very little. Capacitor, blower, and coil repairs cost more. Duct sealing, repair, or redesign costs vary by home and scope. A technician can give a firm quote after testing.
How often should I service my HVAC system?
Twice a year is a common recommendation: once in spring for cooling and once in fall for heating. Our seasonal HVAC maintenance checklist shows what to do and when.
Get Your Airflow Back on Track
Here is the short version of how to fix HVAC airflow issues. Check the filter first. Open and clear every vent and return. Look for duct leaks or crushed sections. Watch for signs of a weak blower, a dirty coil, or high static pressure. Then call a pro for anything beyond simple checks.
Work in order, from easy to complex. Many homeowners solve the problem in the first two steps. Others need a technician to test and repair hidden issues. Both paths lead to better comfort and lower bills.
Still have weak vents or hot and cold rooms? Air Secure Inc is a trusted HVAC company serving Raleigh, Cary, Apex, Chapel Hill, and nearby North Carolina communities. Our technicians measure airflow, check static pressure, inspect ducts, and fix the cause of the problem. Contact Air Secure Inc to schedule an airflow inspection and get steady, even comfort in every room.